
diff options
| author | Christian Kolset <christian.kolset@gmail.com> | 2025-04-24 23:31:17 -0600 |
|---|---|---|
| committer | Christian Kolset <christian.kolset@gmail.com> | 2025-04-24 23:31:17 -0600 |
| commit | c98972ced700b6250915a21af4b76459365743f3 (patch) | |
| tree | 87f62caa9dbe5dbb997f12f7e167ff4ddbc91697 /tutorials | |
| parent | 342b88e6002fa1eee9b020864d83ddbd79ef3ad9 (diff) | |
Updated markdown files to look better after converting to latex files.
Diffstat (limited to 'tutorials')
| -rw-r--r-- | tutorials/module_1/1_excel_to_python.md | 73 | ||||
| -rw-r--r-- | tutorials/module_1/array.md | 2 | ||||
| -rw-r--r-- | tutorials/module_1/intro_to_anaconda.md | 15 | ||||
| -rw-r--r-- | tutorials/module_1/spyder_getting_started.md | 8 | ||||
| -rw-r--r-- | tutorials/module_2/ai_assisted_programming.md | 6 | ||||
| -rw-r--r-- | tutorials/module_2/problem_solving_strategies.md | 18 | ||||
| -rw-r--r-- | tutorials/module_2/version_control.md | 11 |
7 files changed, 104 insertions, 29 deletions
diff --git a/tutorials/module_1/1_excel_to_python.md b/tutorials/module_1/1_excel_to_python.md new file mode 100644 index 0000000..2bf6a0d --- /dev/null +++ b/tutorials/module_1/1_excel_to_python.md @@ -0,0 +1,73 @@ +# Excel to Python + + +- Importing +- Plotting +- Statistical analysis + + + +## **How Excel Translates to Python** + +Here’s how common Excel functionalities map to Python: + +| **Excel Feature** | **Python Equivalent** | +| ----------------------- | -------------------------------------------------------- | +| Formulas (SUM, AVERAGE) | `numpy`, `pandas` (`df.sum()`, `df.mean()`) | +| Sorting & Filtering | `pandas.sort_values()`, `df[df['col'] > value]` | +| Conditional Formatting | `matplotlib` for highlighting | +| Pivot Tables | `pandas.pivot_table()` | +| Charts & Graphs | `matplotlib`, `seaborn`, `plotly` | +| Regression Analysis | `scipy.stats.linregress`, `sklearn.linear_model` | +| Solver/Optimization | `scipy.optimize` | +| VBA Macros | Python scripting with `openpyxl`, `pandas`, or `xlwings` | + +## Statistical functions + +#### SUM +Built-in: +```python +my_array = [1, 2, 3, 4, 5] +total = sum(my_array) +print(total) # Output: 15 +``` +Numpy: +```python +import numpy as np + +my_array = np.array([1, 2, 3, 4, 5]) +total = np.sum(my_array) +print(total) # Output: 15 +``` + +### Average +Built-in: +```python +my_array = [1, 2, 3, 4, 5] +average = sum(my_array) / len(my_array) +print(average) # Output: 3.0 +``` +Numpy: +```python +import numpy as np + +my_array = np.array([1, 2, 3, 4, 5]) +average = np.mean(my_array) +print(average) # Output: 3.0 +``` + + + +## Plotting +We can use the package *matplotlib* to plot our graphs in python. Matplotlib provides data visualization tools for the Scientific Python Ecosystem. You can make very professional looking figures with this tool. + +Here is a section from the matplotlib documentation page that you can run in python. +```python +import matplotlib.pyplot as plt + +fig, ax = plt.subplots() # Create a figure containing a single Axes. +ax.plot([1, 2, 3, 4], [1, 4, 2, 3]) # Plot some data on the Axes. +plt.show() # Show the figure. +``` + +Check out the documentation pages for a [simple example](https://matplotlib.org/stable/users/explain/quick_start.html#a-simple-example) or more information on the types of plots you came create [here](https://matplotlib.org/stable/plot_types/index.html).
\ No newline at end of file diff --git a/tutorials/module_1/array.md b/tutorials/module_1/array.md index 3385231..449135a 100644 --- a/tutorials/module_1/array.md +++ b/tutorials/module_1/array.md @@ -15,7 +15,7 @@ A two-dimensional array would be like a table: A three-dimensional array would be like a set of tables, perhaps stacked as though they were printed on separate pages. If we visualize the position of each element as a position in space. Then we can represent the value of the element as a property. In other words, if we were to analyze the stress concentration of an aluminum block, the property would be stress. - From [Numpy documentation](https://numpy.org/doc/2.2/user/absolute_beginners.html) -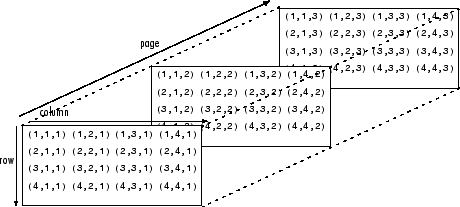 + If the load on this block changes over time, then we may want to add a 4th dimension i.e. additional sets of 3-D arrays for each time increment. As you can see - the more dimensions we add, the more complicated of a problem we have to solve. It is possible to increase the number of dimensions to the n-th order. This course we will not be going beyond dimensional analysis. diff --git a/tutorials/module_1/intro_to_anaconda.md b/tutorials/module_1/intro_to_anaconda.md index cbd9dd2..05fe686 100644 --- a/tutorials/module_1/intro_to_anaconda.md +++ b/tutorials/module_1/intro_to_anaconda.md @@ -3,15 +3,14 @@ Anaconda Navigator is a program that we will be using in this course to manage Python environments, libraries and launch programs to help us write our python code. The Anaconda website nicely describes *Navigator* as: -<blockquote> - <p> a graphical user interface (GUI) that enables you to work with packages and environments without needing to type conda commands in a terminal window.Find the packages you want, install them in an environment, run the packages, and update them – all inside Navigator. -</blockquote> + +*a graphical user interface (GUI) that enables you to work with packages and environments without needing to type conda commands in a terminal window.Find the packages you want, install them in an environment, run the packages, and update them – all inside Navigator.* + To better understand how Navigator works and interacts with the anaconda ecosystem see the figure below.  As you schematic indicated, Navigator is a tool in the Anaconda toolbox that allows the user to select and configure python environments and libraries. Let's see how we can do this. - ## Getting Started Note to windows 10 users: Some installation instances do not allow users to search the start menu for *Navigator*, instead, you'll have to find the program under the *Anaconda (anaconda3)* folder. Expand the folder and click on *Anaconda Navigator* to launch the program. @@ -29,11 +28,11 @@ Although the base environment comes with many libraries and programs pre-install 1. Click on the *Environments* page located on the left hand side. -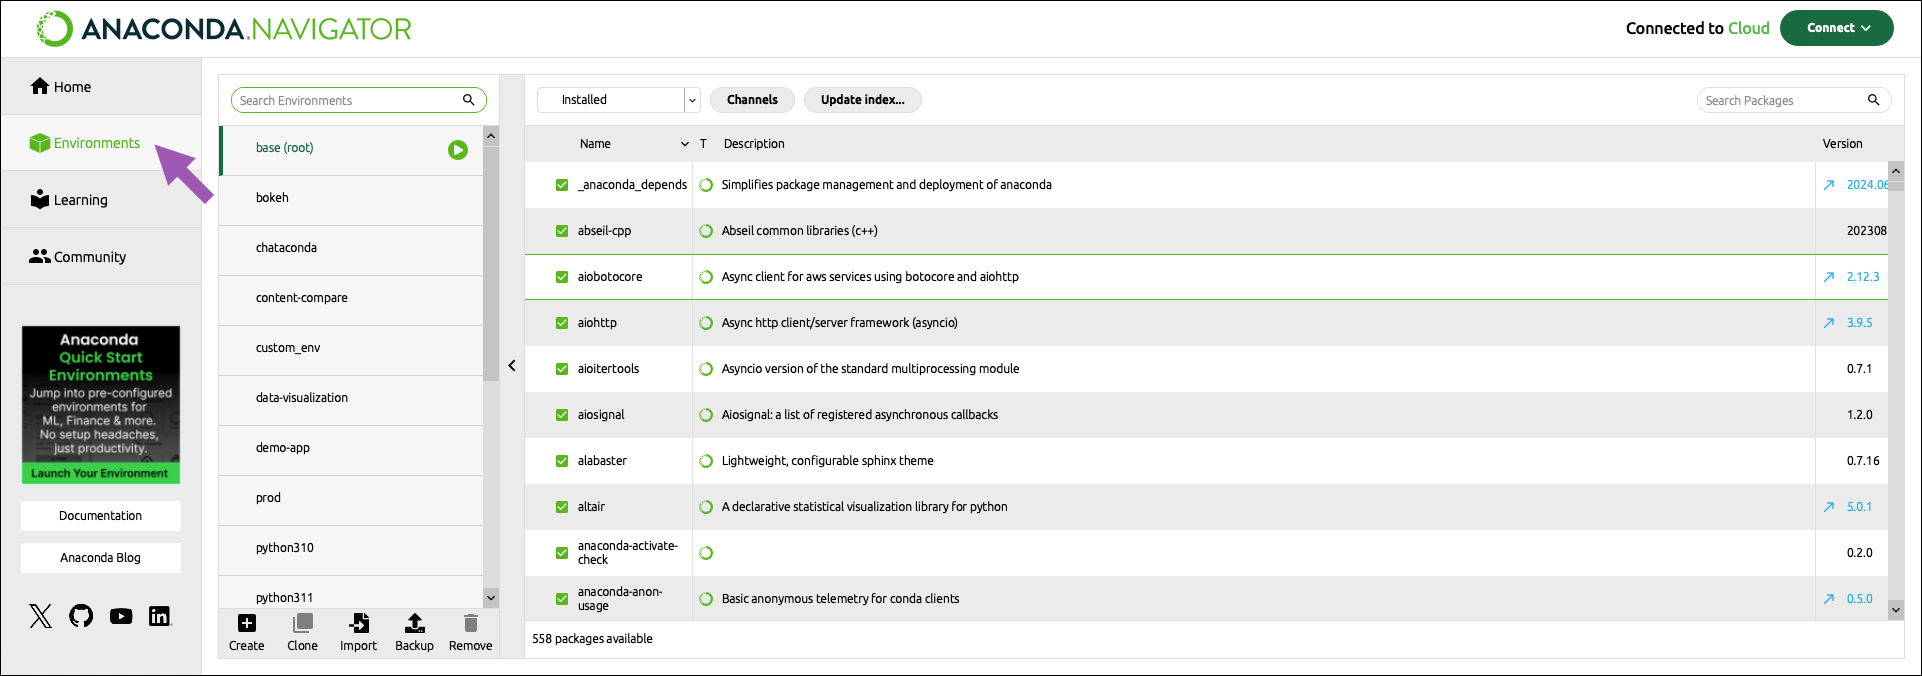 + 2. At the bottom of the environments list, click *Create*. - + 3. Select the python checkbox. @@ -50,7 +49,7 @@ Now that we have a clean environment configured, let us install some library we 1. Navigate to the environment page and select the environment we just created in the previous section. - + 2. Use the search bar in the top right corner to search for the following packages: @@ -74,6 +73,6 @@ From the *Home* page you can install applications, to the current environment we 3. From the Home page find the Spyder IDE tile. Click the *Install* button to start the download. - + 4. Once the download is complete, press *Launch* to start the applications.
\ No newline at end of file diff --git a/tutorials/module_1/spyder_getting_started.md b/tutorials/module_1/spyder_getting_started.md index ba055d7..c79568b 100644 --- a/tutorials/module_1/spyder_getting_started.md +++ b/tutorials/module_1/spyder_getting_started.md @@ -7,14 +7,14 @@ Using Anaconda we will select the environment we created earlier *spyder-dev* an ## Spyder Interface -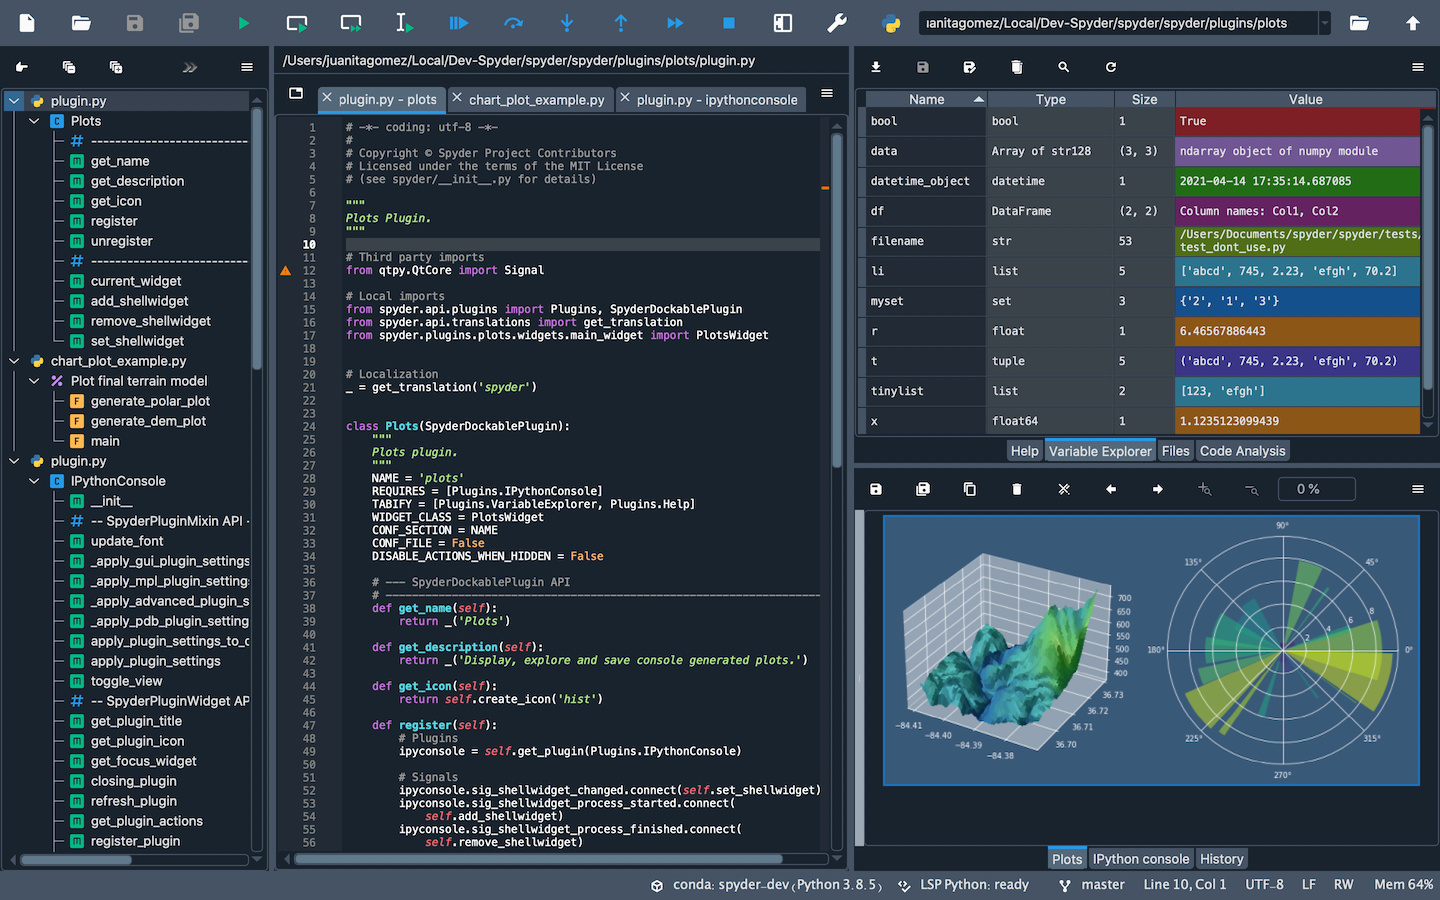 + Once you open up Spyder in it's default configuration, you'll see three sections; the editor IPython Console, Help viewer. You can customize the interface to suit your prefference and needs some of which include, rearrange, undock, hide panes. Feel free to set up Spyder as you like. ### Editor This pane is used to write your scripts. The -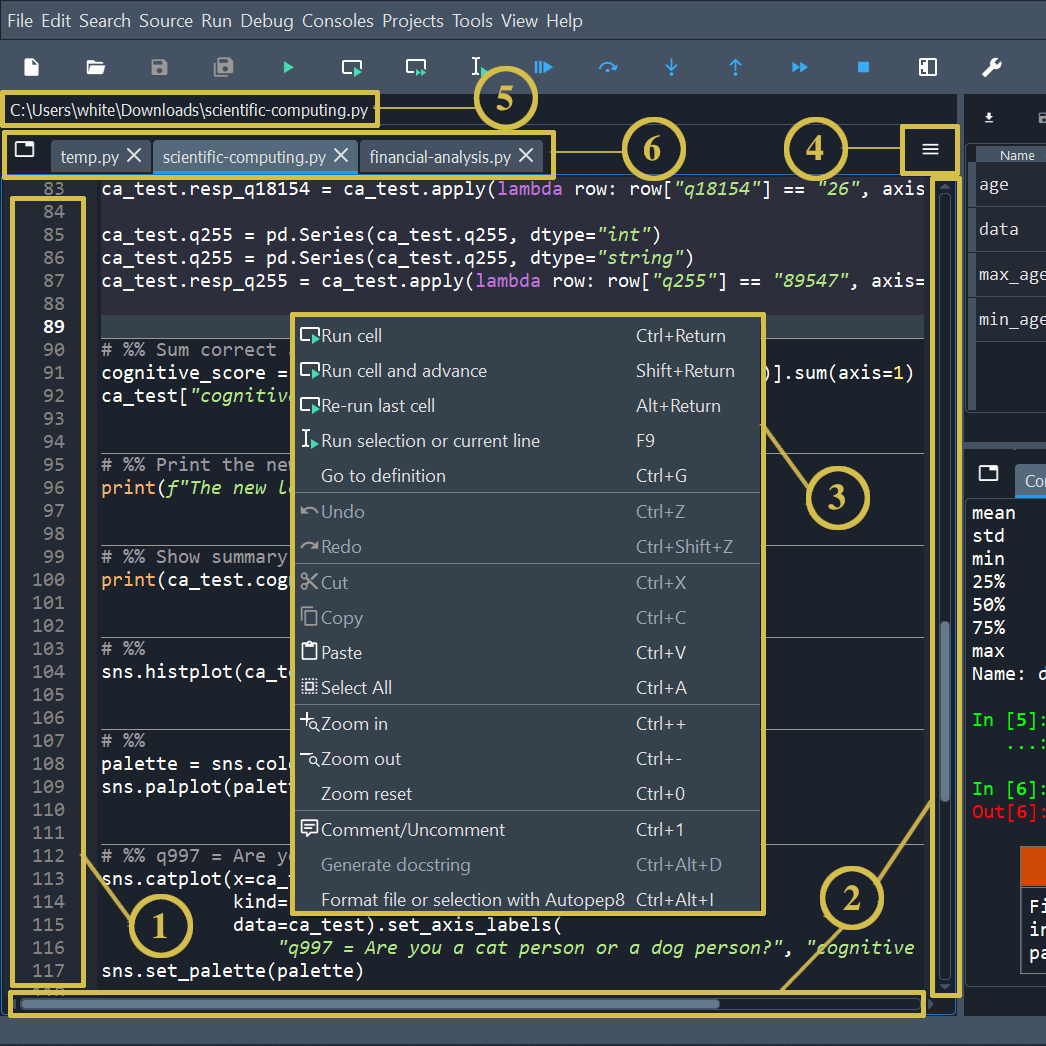 + 1. The left sidebar shows line numbers and displays any code analysis warnings that exist in the current file. Clicking a line number selects the text on that line, and clicking to the right of it sets a [breakpoint](https://docs.spyder-ide.org/5/panes/debugging.html#debugging-breakpoints). 2. The scrollbars allow vertical and horizontal navigation in a file. @@ -26,7 +26,7 @@ This pane is used to write your scripts. The ### IPython Console This pane allows you to interactively run functions, do math computations, assign and modify variables. -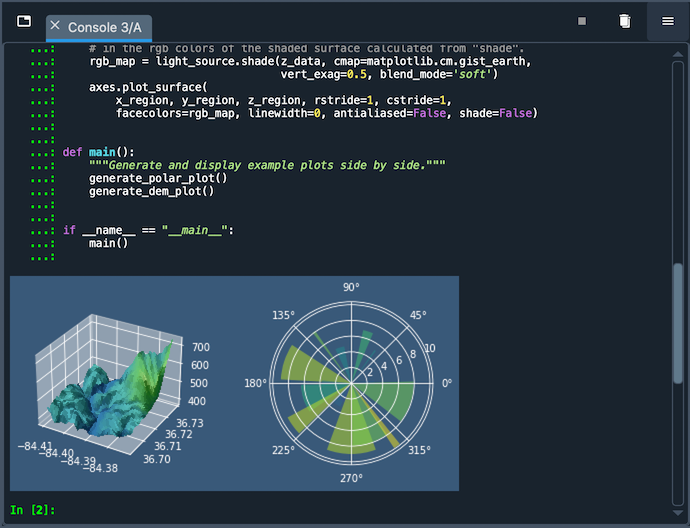 + - Automatic code completion - Real-time function calltips @@ -37,5 +37,5 @@ This pane allows you to interactively run functions, do math computations, assig ### Variable Explorer This pane shows all the defined variables (objects) stored. This can be used to identify the data type of variables, the size and inspect larger arrays. Double clicking the value cell opens up a window which allowing you to inspect the data in a spreadsheet like view. -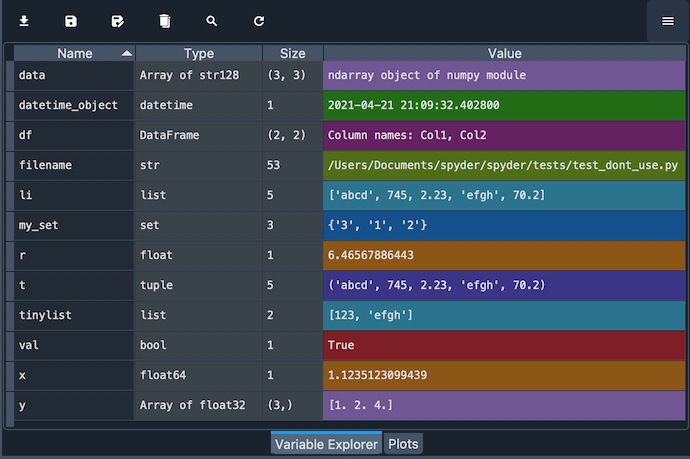 + diff --git a/tutorials/module_2/ai_assisted_programming.md b/tutorials/module_2/ai_assisted_programming.md index bccedbd..86be2d7 100644 --- a/tutorials/module_2/ai_assisted_programming.md +++ b/tutorials/module_2/ai_assisted_programming.md @@ -2,10 +2,12 @@ ## What is it? Artificial Intelligence (AI) has been around for a long time. However, not until recently did engineers make it easy and "fun" to work with. By now you probably have a pretty good idea of what AI can do. However, you may not have used an AI assistant before. As the name suggests, an AI assistant can help you develop code, speed up your writing with code suggestions and allows you to focus on solving the problem at hand rather. AI is a technology that is constantly improving. As engineers we need to *understand* how we can use AI as a tool to achieve our goals more efficiently. This section cover good practices of how we can implement AI and lists some AI assistant tools that we can use. + ## Good vs. Bad uses of AI Don't try to get AI to do work *for you* but *with you*. You need to understand what you're doing. If you don't understand what the AI is doing, then you're not in control of the work. You're not going to go far until something unexpected happens. AI is a great learning tool, research as show that students can benefit from using AI as personal tutor [more](https://hbsp.harvard.edu/inspiring-minds/ai-as-personal-tutor). + ## Available tools Below is a comprehensive list of tools that are available at not cost to you. @@ -22,6 +24,7 @@ Below is a comprehensive list of tools that are available at not cost to you. | Codeium | Free | | aiXcoder | Free | Many of the tools above come with similar, if not, the same features. Some of the tools come as chatbots on the web and others are extensions that can be implemented in your favorite IDE. + ## VSCode and GitHub Copilot Integration We will not cover how to use VSCode in this course, however it is a very versatile IDE that comes with many other extension, for example git, github and github copilot integration. There are also other extensions for other IDE's however we will only cover some basic features that the GithHub Copilot extension in VSCode can do. @@ -34,5 +37,6 @@ Copilot Comes with the following features: [VSCode](https://code.visualstudio.com/) [Copilot extension](https://code.visualstudio.com/docs/copilot/setup-simplified) -## A note on integrity + +## A note on intellectual property If you have a non-disclosure-agreement (NDA) with your employer, it may not always be possible to use AI for security and integrity reasons as you may risk exposing confidential information with third party vendors. It is highly recommended to be able to be able to write program independently of an AI assistant. Always think before you share data.
\ No newline at end of file diff --git a/tutorials/module_2/problem_solving_strategies.md b/tutorials/module_2/problem_solving_strategies.md index 1a50aec..50216ab 100644 --- a/tutorials/module_2/problem_solving_strategies.md +++ b/tutorials/module_2/problem_solving_strategies.md @@ -8,8 +8,8 @@ By the end of this lesson, students will be able to: - Translate engineering problems into structured programming logic. - Use software tools to implement, test, and refine engineering solutions. ---- -## 1. Define the Problem + +## Define the Problem Like many other classes we need to frame the problem before working it. So before jumping straight into coding or building models, clearly define the engineering problem. @@ -17,8 +17,8 @@ Like many other classes we need to frame the problem before working it. So befor - **Establish system constraints and assumptions.** Identify physical laws, design requirements, and performance limits. - **Clarify computational objectives.** What are you trying to calculate, simulate, or optimize? ---- -## 2. Think Algorithmically + +## Think Algorithmically Since we are going to use computers to calculate our solution we first need to break the problem into logical steps that a computer can follow. @@ -33,8 +33,8 @@ Since we are going to use computers to calculate our solution we first need to b 3. Plot the stress-strain curve. 4. Identify the yield point or modulus. ---- -## 3. Write & Execute the Code + +## Write & Execute the Code - **Choose the right tools.** Are there libraries I can use to get to my objective more effectively? - **Write modular code.** Use functions to separate different tasks (e.g., reading data, computing values, plotting). @@ -42,8 +42,8 @@ Since we are going to use computers to calculate our solution we first need to b **Example:** Write a Python script that uses NumPy and Matplotlib to load a CSV file, compute stress and strain, and generate plots. ---- -## 4. Test and Validate + +## Test and Validate - **Assess the feasibility of your results.** Do the values align with expected physical behavior? - **Compare against established benchmarks.** Validate solutions using experimental data, literature values, or known theoretical limits. @@ -51,7 +51,7 @@ Since we are going to use computers to calculate our solution we first need to b **Example:** If your plot shows stress values in the thousands when you expect hundreds, check unit conversions in your formula. ---- + ## Case Study: Simulating a Spring-Mass System **Scenario:** Model the motion of a mass-spring-damper system using a numerical solver. diff --git a/tutorials/module_2/version_control.md b/tutorials/module_2/version_control.md index 78b90db..7d633a5 100644 --- a/tutorials/module_2/version_control.md +++ b/tutorials/module_2/version_control.md @@ -11,7 +11,6 @@ In the open-source community VCS is the In this section is divided up into two major sections. The first section *Git* will cover the basics of how to create backups of your project. The second section will cover how to use git with GitHub to *collaborate* on projects. ---- ## Git Git is a version control program that tracks changes to files and directories using snapshots. It is a distributed version control system, meaning that each developer has a complete copy of the repository on their local computer. Git is the most widely used version control system and is popular among developers for its speed, flexibility, and efficiency. @@ -24,13 +23,13 @@ Pay attention now — here is the main thing to remember about Git if you want t This leads us to the three main sections of a Git project: the working tree, the staging area, and the Git directory. - + ### Branching In git, branches allow for parallel workflow on a project. It give contributors the ability to work different features at the same time. Each branch represents an independent line of development, and once a feature or fix is complete, it can be merged back into the main branch. Here is a common branching structure used in many Git projects: - Main Branch - The main branch (a.k.a. master branch) is the default branch in a Git repository and contains the stable version of the code. - Development Branch - is created to develop a new feature or fix a bug without affecting the main branch. It isn’t necessarily always stable, but whenever it gets to a stable state, it can be merged into master. - Topic Branch - A topic branch is a short-lived branch that you create and use for a single particular feature or related work. -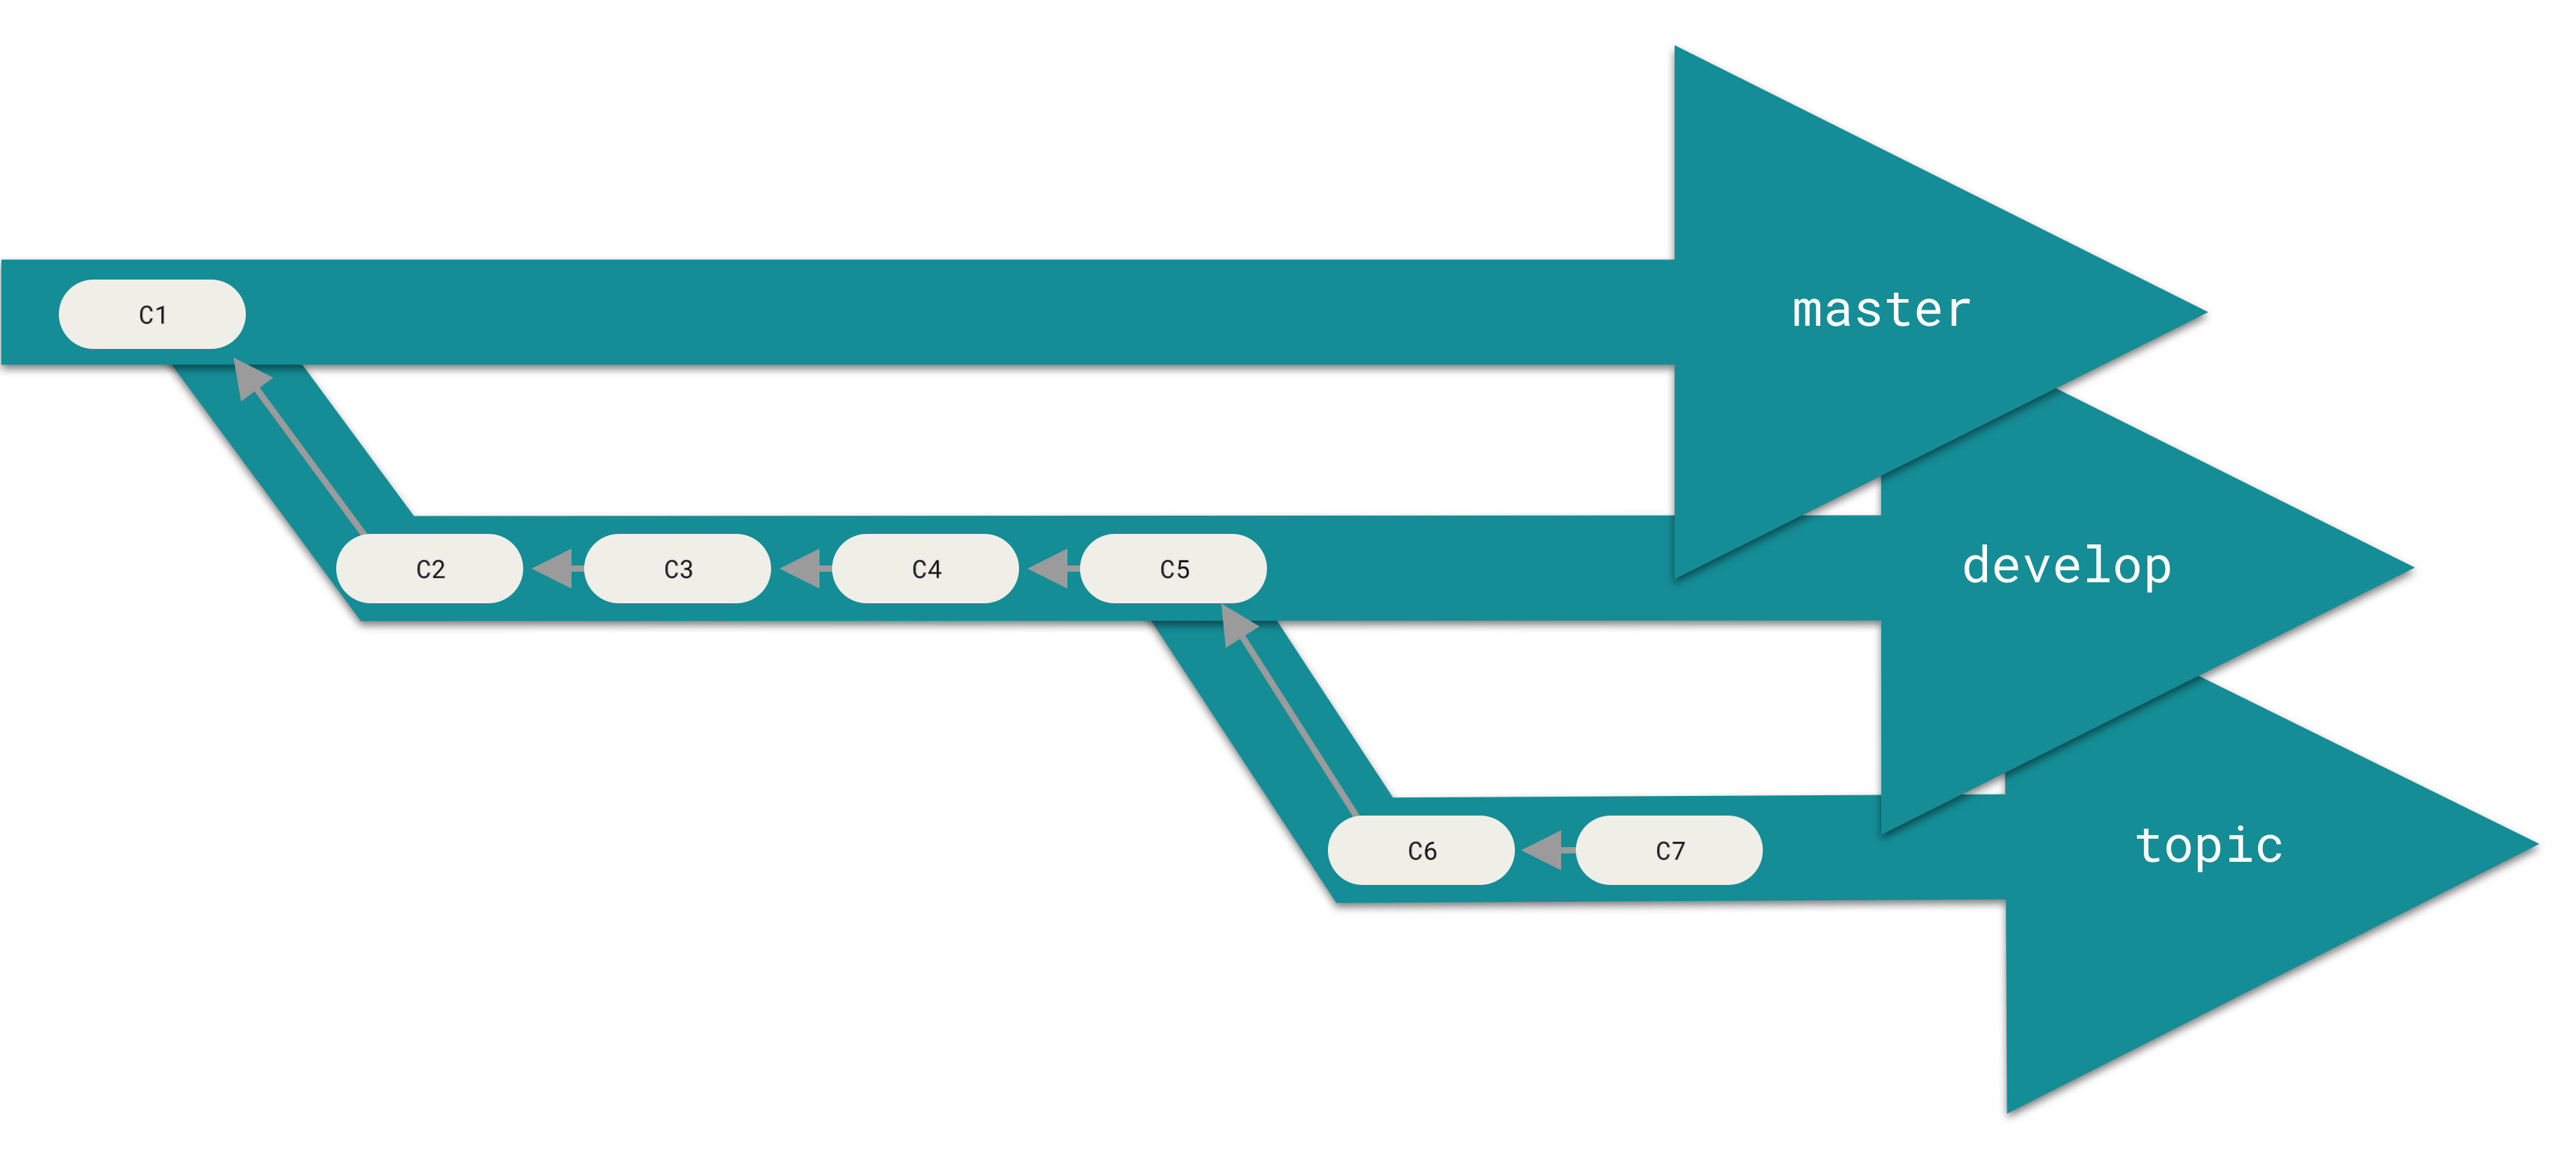 + ### Best Practices - Use descriptive commit messages. - Commit early and often. @@ -75,17 +74,17 @@ Depending on the size of the project and whether the project is closed- or open- **Centralized**: The project has only one central hub or *repository*, can accept code and everybody synchronizes their work with it. This model is suitable for small and closed-sourced projects. -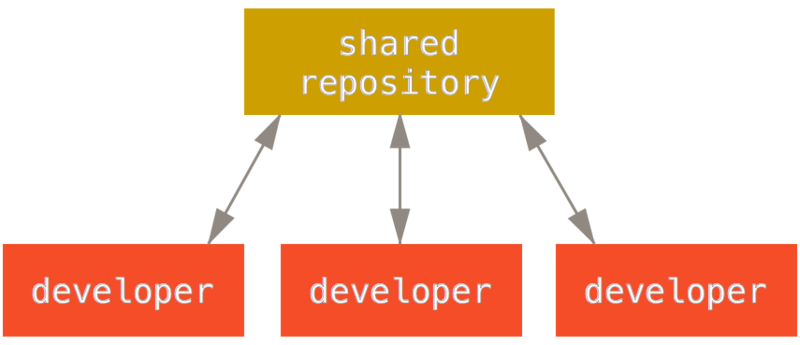 + **Integration-Manager:** There are multiple public variants of the code original code known as *forks*. The integration manager can decide what features to pull from the forks. This is the model that is similar to the one used on GitHub -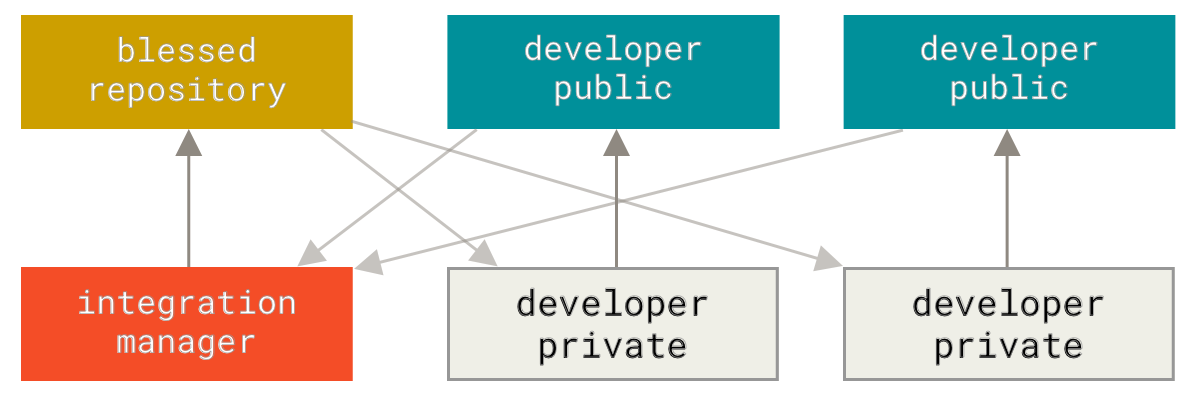 + **Dictator and Lieutenants Workflow:** This is similar to the integration-manager model, however due to the size of the project. A rank of integration managers is formed. one example of this is the development of the Linux kernel. -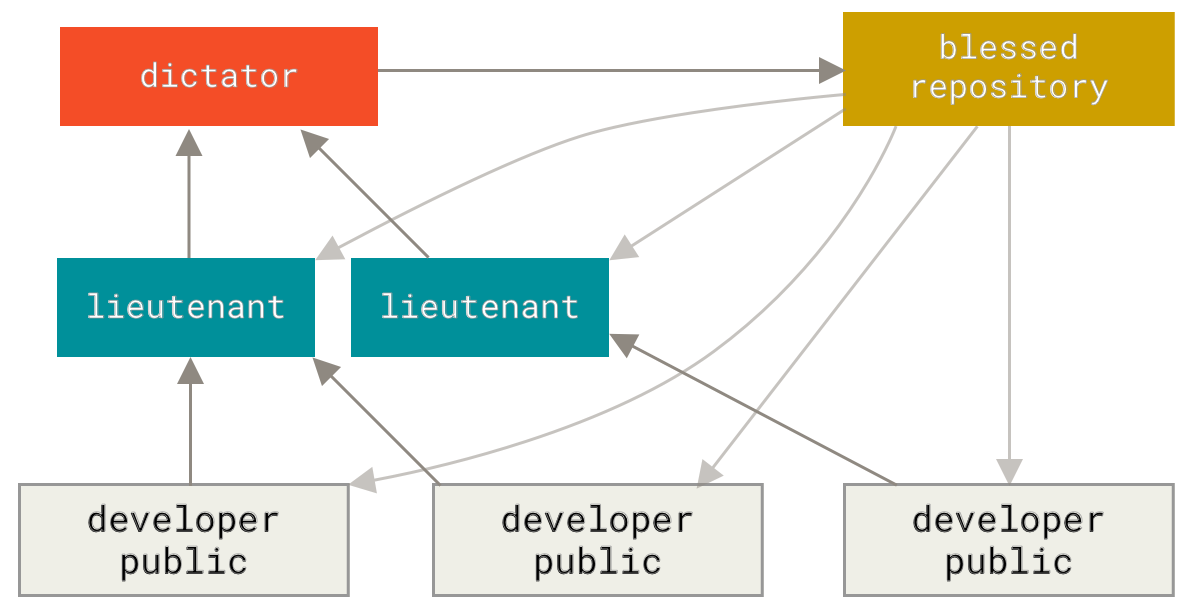 + GitHub is designed around a particular collaboration workflow, centered on Pull Requests. This flow works whether you’re collaborating with a tightly-knit team in a single shared repository, or a globally-distributed company or network of strangers contributing to a project through dozens of forks. It is centered on the Topic Branches workflow covered in Git Branching. |